Archive for March 29, 2019

How Black Water Rafting Works

Like tubing in general, cave tubing is best undertaken with some precautions in mind. Luckily, most of the requirements for a safe and enjoyable black water rafting experience are provided by the guide company.

Which brings us to the first tip: Go with a guide.

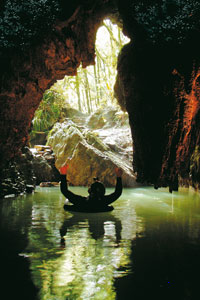
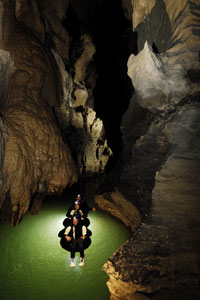
A tuber floating near the entrance at Waitomo. It’s best to find out what the entire tour entails before you sign up.

It may seem like a simple thing, floating along a quiet river; but a cave river, like most rivers, can have some rough spots. This, along with the unique environment of a cave-tubing trip, means it’s best to go with an expert. A black-water-rafting company is also equipped to provide its patrons with everything they’ll need during the tour, including wet suits, headlamps, inner tubes, rappelling equipment, and often a snack to keep energy levels up for that final climb up a waterfall to reach the surface.

It’s also a good idea to wear waterproof shoes and bring a waterproof disposable camera, or else a waterproof case for your regular camera if you want to risk it — you probably won’t be able to fish it out of the darkness if you drop it in the water.

Camera mishaps are rough, but they’re nothing compared to finding yourself staring at a necessary 50-foot (15-meter) zip-line ride across a cave gorge that you’re not physically prepared to cross. Be honest about your fitness level, both to the guide company and to yourself. Read more

Black Water Rafting Adventures

Beneath a canopy of glowworms (actually, they’re not worms; they’re the larvae of the Arachnocampa luminosainsect, or New Zealand fungus gnat), a line of inner tubers floats slowly along a river. They’re about 150 feet (46 meters) below the surface, winding their way through a cave in Waitomo, New Zealand.

Three connected tubers drift along the Waitomo River, where the term “black water rafting” was coined.

A black water rafting journey through the Waitomo Glowworm Caves is one for the travel journals. Waitomo is home to the Legendary Black Water Rafting Co., which coined the term for the adventure and runs two trips out of Waitomo: the Black Abyss and the Black Labyrinth. Both involve inner tubing along the frigid Waitomo River in the dark, but the trips require different levels of physical fitness.

The Black Labyrinth is for beginners and requires only a base level of fitness and health. It’s a three-hour cave tour both on foot and inner tube, and it has one short waterfall drop. The Black Abyss is a more advanced black water experience that includes a 110-foot (34-meter) rappel down to the cave floor and includes waterfall jumps, climbing, a 50-foot (15-meter) rush on a zip line, and squeezing through narrow cave formations over a five-hour adventure. The Abyss is really only for people who are in pretty good shape. Read more

How Black Water Rafting Works

In the Waitomo Glowworm Caves of New Zealand, thousands of tiny, phosphorescent creatures light the underground ceiling like constellations. The effect is a silent night sky, all the more silent for cave explorers without footsteps.

The water isn’t black and there aren’t rafts, but black water rafting, or cave tubing, is still an exciting adventure.

It’s one of the ways to experience the Waitomo cave system: on the water. A river runs through the below-ground caverns, and back in the 1980s, some caving Kiwis came up with the experience known as black water rafting. It was intended as a new take on caving for those extreme-sports enthusiasts bored of simply trekking through dark spaces by foot. It soon became a big tourist draw, though. It’s now one of the most popular shore excursions for cruise line passengers disembarking in Belize, another location where black water rafting has taken off.

In reality, black water rafting happens neither on black water nor on a raft. It’s regular old clear water, but it’s dark because it’s flowing along the floor of a cave, and “rafters” are floating on inner tubes. The experience varies by location, and at each black-watering cave there are a variety of trips available. Some are for novices, slow and calm and without too much scrambling through narrow passages. Others are for more advanced adventurers, with rapids, waterfall drops and rappelling down through 3-foot (91-centimeter) openings to reach the underground river. Read more

Purifying Water

If you’re lost in the wild near a river or lake, half the battle is over. In order to safely drink this water, you need to purify it. Boiling is the best and easiest way to make fresh water safe — 10 minutes at a steady boil is a good rule of thumb. Of course, boiling water means you need fire and a container of some kind. If you don’t have a container, you can probably find one or more of these items:

  • Aluminum can
  • Tin can
  • Large shell
  • Plastic bottle
  • Glass jar

Boil your water for at least ten minutes to kill all bacteria.

Use your shirt or other cloth to filter out large bits of sediment before boiling. Believe it or not, plastic bottles do work for boiling. One method is to completely fill the bottle with water, cap it and drop it into some hot coals. The lack of air in the bottle should keep it from melting. If you don’t have enough water to fill the bottle, suspend it above the fire with rope or vine so the flames just touch the bottom. The risk of boiling in a plastic bottle is that your bottle and main collection device may be gone. If you can’t start a fire, leave the water in the sun in a clear container to help kill bacteria.

Another way to purify water is to use purification tablets. Many companies manufacture them, and they’re mandatory in any survival kit. The tablets use either iodine or chlorine to treat the water. Many people are allergic to iodine, so make sure you know if you are before you use them. Murky water often needs more than one tablet to make it safe, and any tablet needs at least 30 minutes to be fully effective. Like with boiling, it’s best to give the water an initial straining with some kind of cloth. It’s also safer to drink warmer water, so if it’s from a cold mountain stream, allow it to heat up a little in the sun first. Read more

More Water Collection Techniques

If your energy is low, you’ll want to avoid the digging involved in a belowground still. All you really need is a clear plastic bag, and you can use the transpiration technique to collect potable water:

  • In the morning, take a bag and tie it around a leafy green tree branch or shrub.
  • Weight the inside with a rock to create a low point for the water to collect.

Over the course of the day the plant will transpire and produce moisture that will collect at the low point. Poke a hole to drink the water or pour it into a container for later. The water will taste like whatever plant you choose, but it’s better than nothing. It’s also important to use non-poisonous vegetation. Once you’re done, tie the hole shut and reuse the bag. Read more